Monday, February 24, 2014
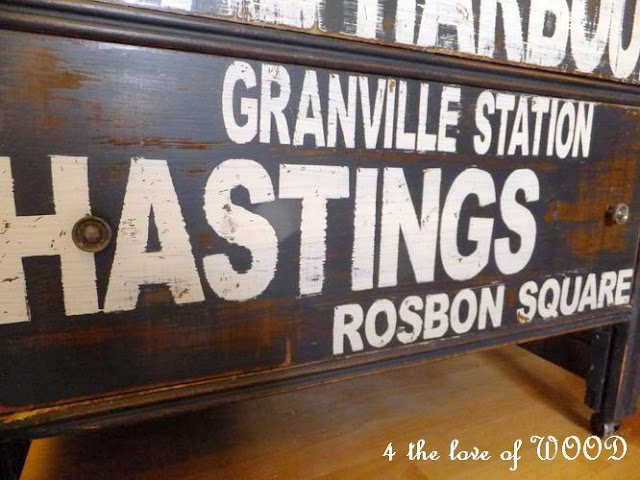
ART DECO TURNED SHAKER vancouver subway art dresser

How to take an Art Deco Dresser and give it a Shaker Style.

One thing that dates art deco furniture is the flush and rounded tops.

So I removed the original top and replaced it with a nice fresh pine board cut to size.

With some walnut stain, wax, and my new gloves we were off to the races.


Having a curvy kick at the bottom is common in a lot of furniture
but I removed this one to get straighter lines and offer a masculine feel.
Two final steps to help achieve the look was to add the vintage metal wheels
and simple metal knobs down both sides of the drawers.

And thats how you get a shaker look from an Art Deco Dresser.
More beauty pics can be seen on yesterdays post
Next time Ill share how I did my lettering and finish on the drawers.

FAUX MARBLE painting a dresser
Our furniture make over class was a great success and the trip over all was fun but Im pooped out!
Until I get all the photos in order, all my supplies restocked, and the tools put away,
Im going to show you some projects from the past and ideas I have not shared yet.

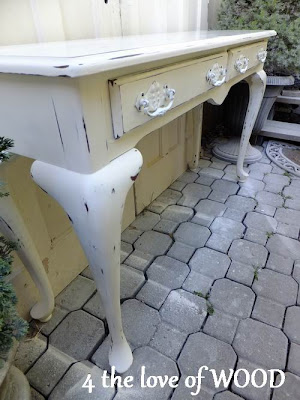
Its an *OLD WORLD* style dresser with a faux marble top.

We got this dresser many years ago. It was bright teal when we got it!
The color was very pretty but it had many stickers and the finish was damaged in several places.
It really deserved a classic finish!
 |
| BEFORE and AFTER |


Since we redid our dressing room it really did not have a place with us any more.
So it was time to move on and let it go to a home where it could be used again.
Thats when it went to live in Joelles foyer!

It was meant to be!

The Chippendale style hardware I used was sprayed with OIL RUBBED BRONZE
from Rustoleum. Its a delicious metallic chocolate color.
The top has seven coats of poly in this photo but a few more were applied to
give it a thicker glassy finished look to the faux marble top.

I learned to faux paint marble long ago for an in expensive bathtub surround.
I do not have more photos or a tutorial on how to paint this but if you want to learn the
different technics, there are tons of tips, tutorials, and videos on line to help you.

The body color is ASCP old white with Minwax dark wax over top.
The bright teal is still inside lining all the drawers. How fun is that?
Traditional outside with a bit of fun inside.

TIP:
If you are thinking about painting the inside of your drawers remember there are several areas on the
outer edges of drawers that rub against another part of the dresser. Paint doesnt slide well against
other painted surfaces, and each layer of paint can make things tighter, so try to paint only one of the
surfaces that rub and not the other. In the photo I have offered one example but the most important
place to use this tip is on the side of your drawers.
Paint either the drawer side or the inside edge of the cabinet body but not both.
Consider which one is seen more often.
Sharing with:

Remaining 8 done
I finished the 8 frames. Now Im going to trade them for the original 2 and make slight modifications to the first two. That will only take a night or two because all the prep work is done and the first 2 were already stained and finished.
Pics:
I mounted one of my certificates so one can see the desired result. Behind the certificate is a burgundy paper.

The back now has "turn buttons" instead of nails. Makes for easier mounting of the certificates. I also drilled a larger recess for the pennies in the sycamore. Something tells me that will allow for more freedom of movement of the wood. The eye screws, hanging wire, and a descriptive note are all attached.

Read More..
Pics:
I mounted one of my certificates so one can see the desired result. Behind the certificate is a burgundy paper.

The back now has "turn buttons" instead of nails. Makes for easier mounting of the certificates. I also drilled a larger recess for the pennies in the sycamore. Something tells me that will allow for more freedom of movement of the wood. The eye screws, hanging wire, and a descriptive note are all attached.

Sunday, February 23, 2014
THE WOODS IN FLORIDA


For those of you who know about our vacation we thought we would
share a few pictures of us on our sunny beach in Florida.

I want to send out a special hello and thanks to some of the fabulous ppl I have met
in my furniture adventures who support me and provide me with encouragement regularly.
My dear friend Lisa reminds me how much I appreciate common sense.
Carrie who is there when I need to step away for a break.
Bliss who is a wonderful character and great supporter of 4TLOW
Catherine my alter ego south of the border.
Shelly keeps me thinking out side of the box with color.
Karen teaches us that dumpster diving is nothing to be ashamed of.
Leigh finds a way to ground me and make me soar every time we talk.
Pink Pam one of my biggest fans that continually lets me know it.
and lastly Jen and Oli who will never be last in our book.
I also wanted to let you know that I have added a new page of
popular questions which can be found here
as well as a convenient FAQ tab at the top of the page to view when you like.
FRONT MOUNTING HARDWARE

When I first started to strip this table down to be worked on, I notice the handle mounting
was small. You can find handles that mount any where from 1" up to 7" but typically most handles
measure 3". I measured to find these holes were 2.5" apart. This number wont mean much to many of
you but for those looking for handles that mount in 2.5" holes you know they are hard to find.
George tries to keep a few in his Etsy Shop but I didnt want to take them for that very reason.

This was my opportunity to use a set of front mounting handles and share with you this alternative
option for covering over the existing holes.

Front mounting hardware is fastened with screws through a front plate,
the ones I am using are antique brass pulls and the little screws really add to the vintage charm.
They have been positioned right over the existing holes and I predrilled for the little screws.

I attached these ones to a broken and water marker Bombay console,
after I fixed the breaks and painted over the water marks of course.


BREADBOX DESK white distressed desk
JUST A SIMPLE SHABBY CHIC REDO
ON A UNIQUE DESK

BREAD BOX STYLE SLIDING DOORS
NEAT EH? <--- canadian


BEFORE & AFTER


ENTIRE SURFACE SANDED
4 COATS OF SPRAYED PRIMER
EDGE DISTRESSED SANDING BETWEEN ALL COATS
2 COATS OF FLAT WHITE PAINT ON THE BODY
3 FINISH COATS OF SEMI GLOSS ON THE TOP SURFACE

Sharing at:


Saturday, February 22, 2014
Garden City Design Urban Planning
The Evolution of Urban Planning in 10 Diagrams - Emily Badger ...
Ebenezer Howards Garden City

Urban planning - Wikipedia, the free encyclopedia
Urban planning - Wikipedia, the free encyclopedia

Read More..
Ebenezer Howards Garden City
Urban planning - Wikipedia, the free encyclopedia
Urban planning - Wikipedia, the free encyclopedia
Attention All Salad Lovers
Hi Everyone,
 I talked to the Blue House folks this morning and weve sold a lot of tickets for the Selkie Wood Works bowl. The sale will go on until December 4. If you would like to purchase a ticket and possibly win a bowl made from a solid piece of ash and help a lot of kids too, you can contact me via my FB page or the Selkie Wood Works blog. Prices are $2.00 a ticket, $5.00 for 3 tickets.
Read More..
Inspiration
For me it all started with a simple idea. I wanted to learn to carve, by hand, with chisels and a mallet, instead of what I had done up to that point in time which was technically tracing pencil lines with a rotary tool.


Nor was it in seeing wainscott chairs.


For a while I have wanted to take the next step from bible boxes and try my hand at an actual joined chest. I think I may just take it another step further after that. Why not a couple Wainscott Chairs after some joined stools? Why not that small folding table? Why not a full sized tavern table? Why not explore the form as much as possible?
Read More..
 |
| The dremel carving on this boarded chest is effective in appearance but the process is distinctly less fulfilling. |
I looked at several books and none of them made sense, or really even covered in depth the carving I wanted to do. Not that I could have clearly explained what I wanted, but I knew I had no interest in rendering three dimensional fish from bass wood (a common theme I saw in several books). I wanted to adorn the case pieces I was building and neither fish nor basswood figured into that in my mind.
Then I floundered onto Peter Follansbees blog "Joiners Notes" (Another fish reference!) and found something I had been looking for. Geometric patterns that could be simple and complex all at the same time, historical reference for the carvings he was doing, domestic hardwoods like oak and walnut, and case pieces from boxes to chests. I was able to finally point at something and say, "There...that is what I want to learn to do."
Then Peter came out with a DVD packed with carving instructions and I was shown the path I had been searching for. But there was so much more down the path that I wasnt expecting. I think Peter is a clever man and along the way to learning to carve in a 17th century style, I also found my self becoming enamored with the furniture it adorned.
 |
| This was always the type of carving I wanted to do. |
Earlier this week I took my eldest daughter, who is home schooled, on a field trip of her own design. We got up very early in the morning and drove across the state to visit some museums in Milwaukee. Ill admit I influenced this decision some, I knew the Milwaukee Arts Museum held a sizable collection of furniture from the Chipstone Collection that I had always wanted to see.
I was blown away seeing several of these pieces in person. These pieces carry a power and permanence that sets them apart. I have grown up looking and and being around good and bad versions of furniture, from Shaker to Craftsman, from Queens Anne to Art Deco, from Modern to Federal, and most everything in between. And to my modern eyes, these "old" pieces looked fresh and new. You just dont see pieces like this around. I have to admit that I have become completely smitten with the style and I am becoming interested in exploring it more completely on my own.
The real revelation for me was not completely held in seeing chests from this period.
Nor in seeing the joined chests. . .
Nor was it in seeing wainscott chairs.
I had seen these types of pieces in photos before.
The piece that grabbed me was this simple little table, with a gate-leg and folding open tabletop.
I didnt know that anything like this was around from that period, and for me it awoke in my mind the idea that this style of Joyned Furniture could be more than historical pieces, it could be furniture you could fill a house with. At around 28" in height it would make a great end table or bed side table.
Then later, in a different section of the Museum I saw this table in a painting of a tavern scene from the same time period, and now an idea started to germinate in my mind.
For a while I have wanted to take the next step from bible boxes and try my hand at an actual joined chest. I think I may just take it another step further after that. Why not a couple Wainscott Chairs after some joined stools? Why not that small folding table? Why not a full sized tavern table? Why not explore the form as much as possible?
What a rabbit hole of inspiration Mr. Follansbee has help open for me. I only hope I get the chance to thank him in person someday.
Ratioine et Passionis
Oldwolf
You should check out Peter Follansbees Blog Joiners Notes
You should also take a look at the Chipstone Collections Page
You should also take a look at Peters New Book from Lost Art Press written with Jennie Alexander and called "Make a Joint Stool From a Tree: An Introduction to 17th Century Joinery" and pre-purchase it (like I did) so you can get free shipping.
